 Ringbook
Manual entry, with fewer clicks
When you already know what to book, Ringbook gives you a fast journal editor: suggestions from earlier entries, reusable amounts, quick cost-center splits and line controls exactly where you need them. You stay in control of the accounts and figures.
Open Book → Add Journal Entry, or open a journal from its Ring to edit it. Enter the date and description, then build the lines. The examples below use sample data; nothing here changes your books.
Try the manual-entry shortcuts
Explore the simplified editor below. Each example starts with its own sample journal so you can see exactly what one action changes.
Interactive practice · sample data
Tap the suggested Bank line to add it to this sample draft.
| Account | Debit | Credit | Segment / order |
|---|---|---|---|
| Rent Expense | 1000 | — |
Suggested journals: accept what fits
Start with a description and an account. When Ringbook finds a useful pattern, grey suggested lines appear beneath your entry. They can propose counterpart accounts, amounts and available segment or subledger details from earlier work.
- Tap a suggested row or its + control to bring that line into your draft.
- Add all, or Tab while the suggestion block is active, accepts the proposed set. This adds draft lines; it does not post the journal.
- Use the suggestion arrows to browse alternatives and × to dismiss an unsuitable set.
- Review the resulting accounts, sides, currency and amounts before saving. A previous journal is a useful starting point, not a guarantee that this event should be booked the same way.
Example: choose Rent Expense and enter 1,200. A suggested Bank credit of 1,200 saves you selecting the counterpart again. Accept it only if that is how this rent was paid.
For document-driven generation, reusable rules and Companion, continue to the AI guide.
Three ways to insert a journal line
Move to the divider between two journal lines. Its three regions do different jobs:
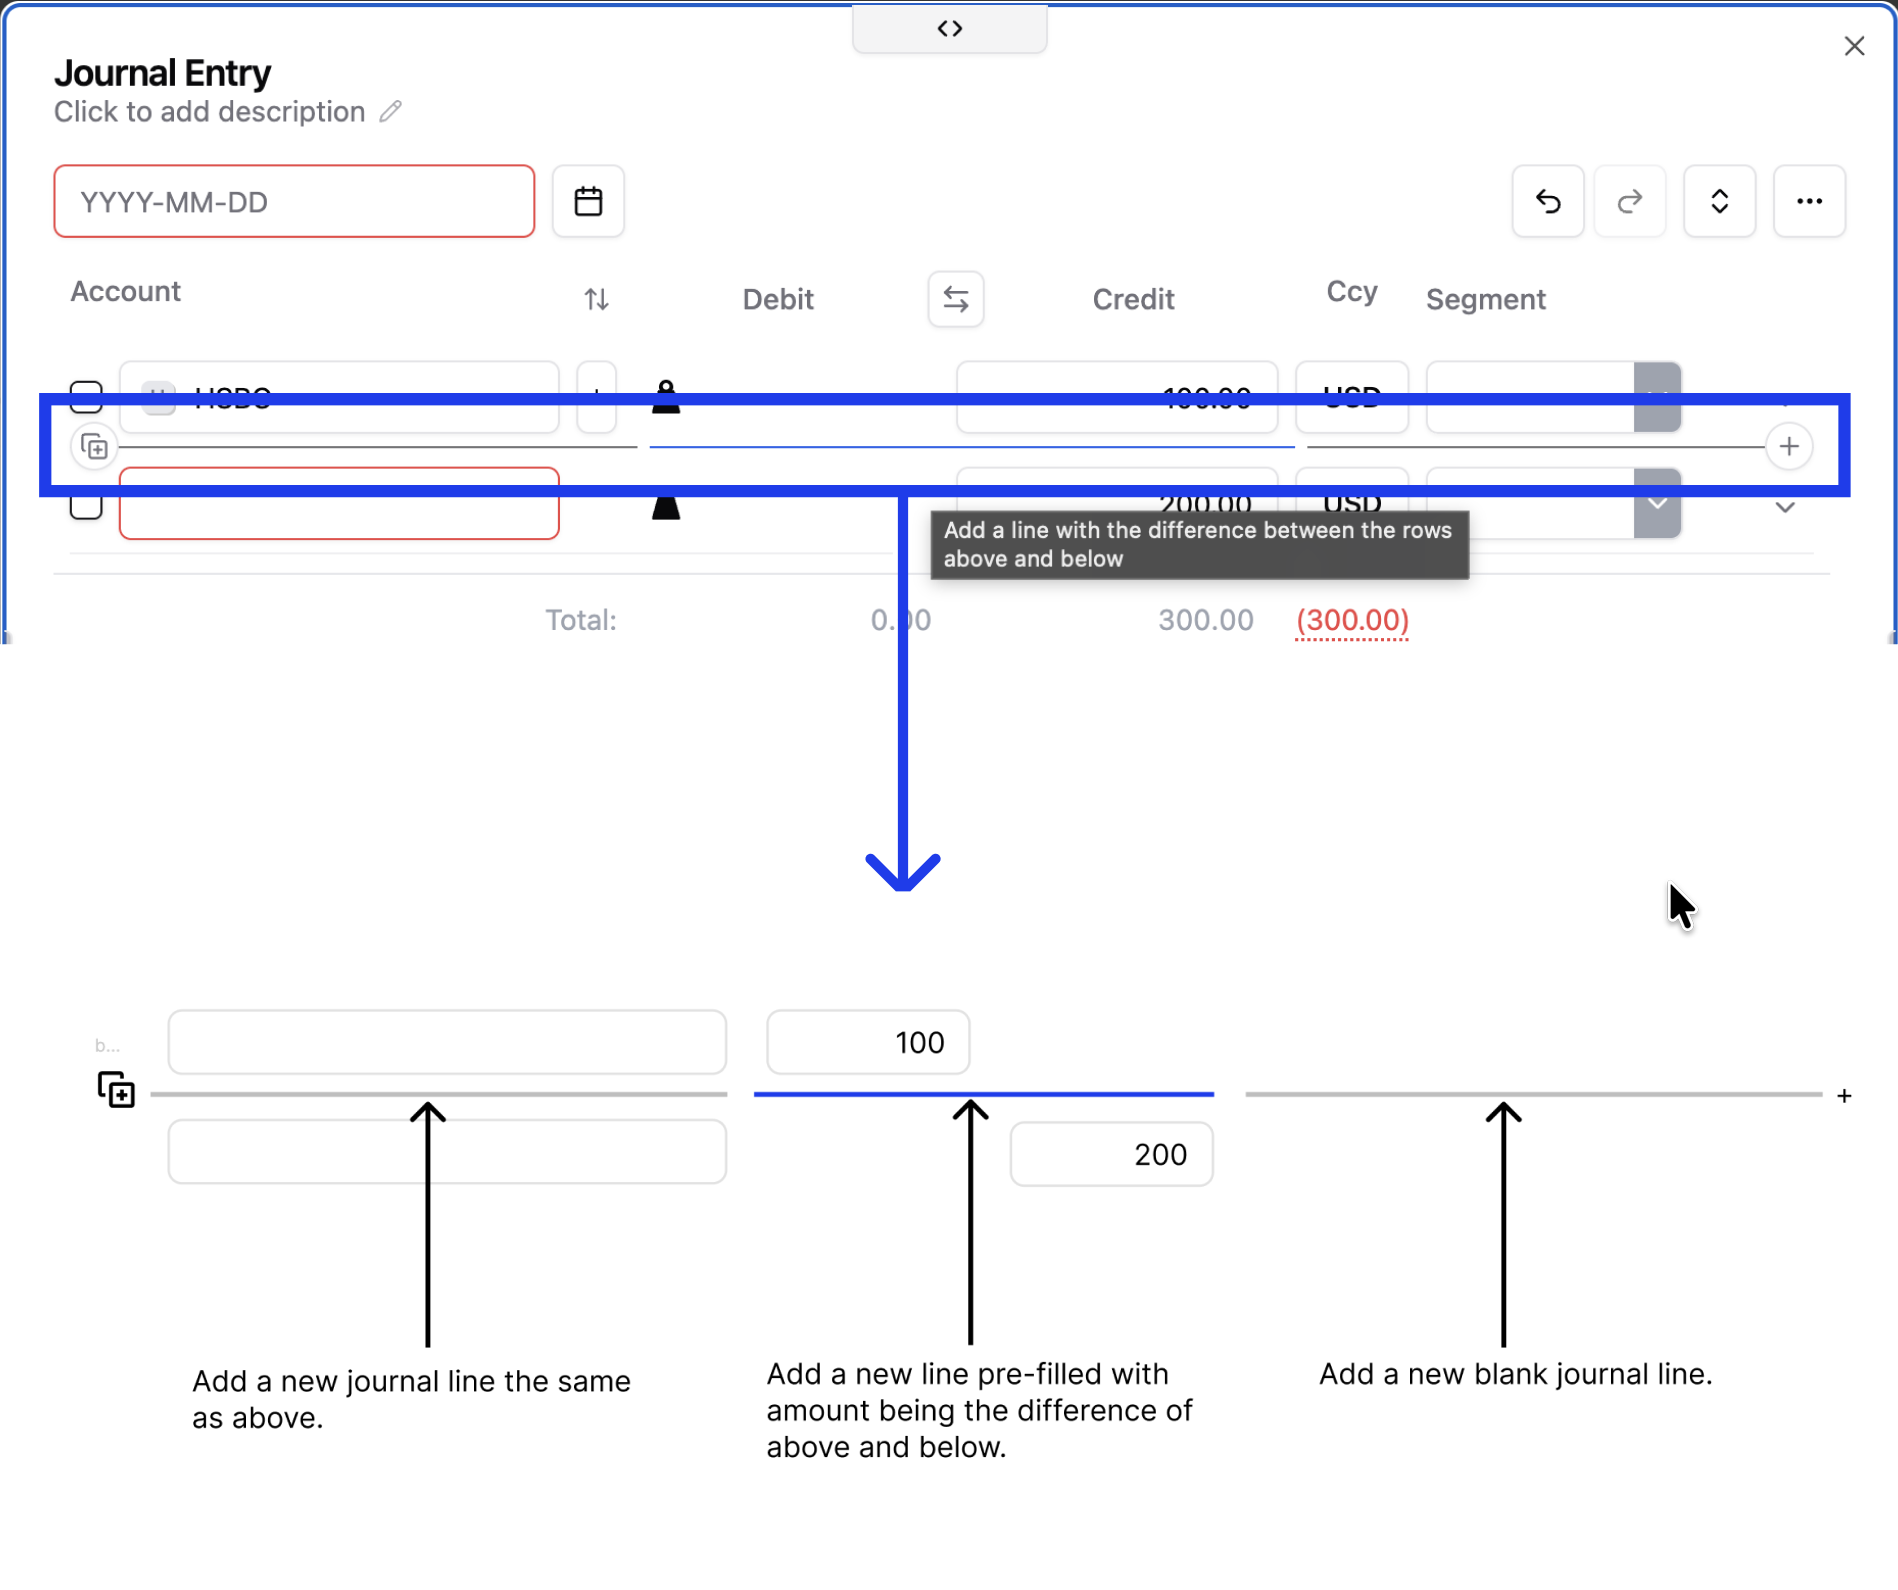
| Where to click | What it does | When to use it |
|---|---|---|
| Left: copy icon / account-side divider | Inserts a copy of the line above, including its account, amount, currency and other line details. | Another similar expense: copy it, then change the amount or segment. |
| Middle: highlighted amount divider | Inserts an amount based on the two immediately neighboring lines, when their amounts and currency allow it. Choose the account for the new line. | Quickly fill a local difference without calculating it separately. |
| Right: + / blank-line divider | Inserts a new blank journal line at that position. | Add a different account without reordering the whole journal. |
How the middle action works: Debit 100 above and Debit 200 below inserts Debit 100. Credit 100 above and Credit 200 below inserts Credit 100. Debit 100 above and Credit 200 below inserts Debit 100 to close that pair’s gap. The middle action looks at those two neighbors, not the total difference for the entire journal.
Reuse amounts with ↑ and ↓
Click inside an amount cell and press ↑ or ↓ to browse the amounts of other lines in their current row order. This replaces the amount in the focused cell while keeping its debit or credit side.
Example: with 100 in the row above, 150 in the focused row and 200 below, ↑ recalls 100. Moving back through the sequence restores 150; ↓ then recalls 200. It is a way to reuse figures already on screen, rather than a +1/−1 stepper. Typing or starting a new edit begins a fresh amount-browsing sequence.
Use this for repeated amounts or a counterpart that should match another line. Check the currency before reusing a figure.
Split a cost across cost centers
Ringbook calls cost centers Segments. Assign one using the Segment field, or use the attached ▾ menu to split a line using a saved allocation driver.
- Set up your segments and driver weights in Accounts → Segments. A driver such as Head Count or Office Area needs positive weights for at least two segments.
- Enter the expense account and amount in the journal.
- Open the ▾ beside Segment and select the driver. Ringbook replaces the line with one line per participating segment.
- Review the resulting amounts and total. Use Undo if you chose the wrong driver.
Example: split Rent Expense 1,000 using Sales 60% / Operations 40%. You get Rent Expense 600 for Sales and Rent Expense 400 for Operations. The Bank credit remains 1,000.
Once your drivers are set up, selecting one applies the split without retyping each amount. This is a menu action, not a universal keyboard shortcut. Some special or combined lines do not offer splitting; expand a combined line first when appropriate.
Arrange lines in an order that makes sense
Drag a line’s grip handle to move it. Put the expense details together, the settlement last, or arrange the lines in the same order as your supporting document.
You can also use the keyboard: Tab to the grip → Space to pick up → ↑/↓ to move → Space to drop.
The line order is saved when you Add or Update the journal and is retained when you reopen it. Reordering the editor is different from changing the sort or grouping of the Book table.
Combine repeated accounts
Below the editor, Combine same account lists eligible repeated accounts and their net totals. Click the account’s Combine row to collapse those journal lines; use Expand to restore them during the current edit.
- Lines must point to the same account, use the same currency and have compatible booking classifications. Identical display names on separate accounts are not enough.
- Same-side amounts add together. Opposite sides net: Debit 300 and Credit 100 on the same eligible account become Debit 200.
- A group that nets to zero stays as separate lines. Incomplete and FX gain/loss lines are not offered as ordinary combine groups.
- Review segment, subledger and memo details before saving. Details shared by every line can carry across; differing details may not survive as a single value on the merged line.
Combining changes the lines that will be saved. It is different from Book’s Grouped display mode, which only changes how entries are shown. Expand or Undo before saving if you need to preserve the original separate lines.
Combine only selected lines
Use the row checkboxes to select the particular lines you want to merge. Combine selected becomes available when the whole selection forms one eligible account/currency group. Other lines remain separate.
Example: Rent Expense has three debits: 100, 200 and 300. Select just the first two and combine them into 300; the third 300 line remains untouched. The selection’s Net total also helps you review the amounts, separately for each currency.
Balance, undo and finish
| Control | Use it for |
|---|---|
| Row balance control | Set that row to the amount needed to balance the journal. Review the account and side afterwards. |
| Total difference | Where offered, add a balancing line for the journal’s overall difference; then choose its account. |
| Undo / Redo | Step back or forward through edits, including line changes, suggestions, splits and combining. |
| Add / Update | Save the reviewed journal, including its line order and changes. |
Before saving, check the date, description, accounts, currency, amounts, segment/subledger details and supporting document. A zero difference confirms that the amounts balance; it does not confirm the classification.
If the final account is still unknown, follow the offered recovery or Not Sure workflow and finish the classification later. Read the Book and journal guide, AI recovery guide, or tips and shortcuts for more detail.